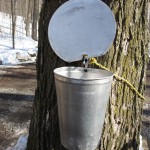
Historically Sweet – Maple Syrup
In the next few weeks, as the temperatures begin to rise, the snow will melt, the icicles will drip, and the sap will flow. And the flowing of sap means something very important, indeed. We are on the verge of maple syrup season.
Canadian Syrup
Canadians are known for their maple syrup. I’m not talking about the fake Aunt Jemima’s stuff either: I’m talking real Canadian maple syrup, tapped from the sugar maple trees throughout our country. Maple syrup can be attributed to the Native Americans who learned that by making a small incision in the trunk of certain trees, the sap could be collected and boiled to create a more concentrated form of the stuff.
The syrup was enjoyed as a drink (can you believe that?) and was used in cooking to sweeten dishes. Today, there are many Native re-enactment museums and villages that will pour freshly boiled maple syrup on top of ice to create a frozen syrup treat. It’s a little too sweet for my tastes but the kids sure do love it.
The Process
The maple syrup process hasn’t changed much since the early days despite the technological advancements and is relatively simple.
Step 1: Identify
Use the summer to identify the maple trees (all maples will work and will all produce a slightly different colour and taste). Sugar maple sap is about 2% more concentrated than that of silver, red, or box elder (another species in the maple family). Trees should have a diameter of about .5m (or 1.5 feet) and should be healthy trees with crowns that are exposed to a good amount of sun.
Step 2: Equipment
You will need some basic equipment and some not so basic. If you’re serious about tapping trees and boiling your own sap, you will need these items. If you’re not quite sure yet, I would suggest taking a trip to observe the process in action. You will need:
- Buckets and lids
- Spiles (tap)
- Hooks
- Cheesecloth
- Some tools: hammer, pliers, drill and bit (5 or 7/16ths)
All of the equipment that will touch the tree needs to be sterilized. You don’t want to introduce anything to the tree that it can’t fend off.
Step 3: Tap
The timing is weather dependent. This year, due to the severe cold weather we had for such an extended time and the lack of mid-season thaw, the season has been pushed back by a few weeks. That’s not stopping tree tappers everywhere from getting ready for the big day.
The sap will begin to flow when temperatures reach above freezing during the day and go back down below 0°C overnight. We are almost there!
Tapping is fairly simple: using your drill and bit (size depends on the size of your spile), drill a 2 inch hole into the tree. Insert the disinfected spile into the hole using the hammer for a little encouragement. You will want to drill slightly upward (gravity will be your friend here).
Hang your bucket from the tree and ensure the lid is in place to keep out rain, snow, and dirt.
Sap will flow immediately if your timing is right. If not, you will have to wait a little longer.
Step 4: Check
Keep an eye on your buckets. Replace full buckets and store sap below 3°C if you don’t plan to use it right away. With that said, you should use it within 7 days of collection.
How are you going to use it? Stay tuned. Next week I’ll give you some tips on boiling and making your own syrup treats.


