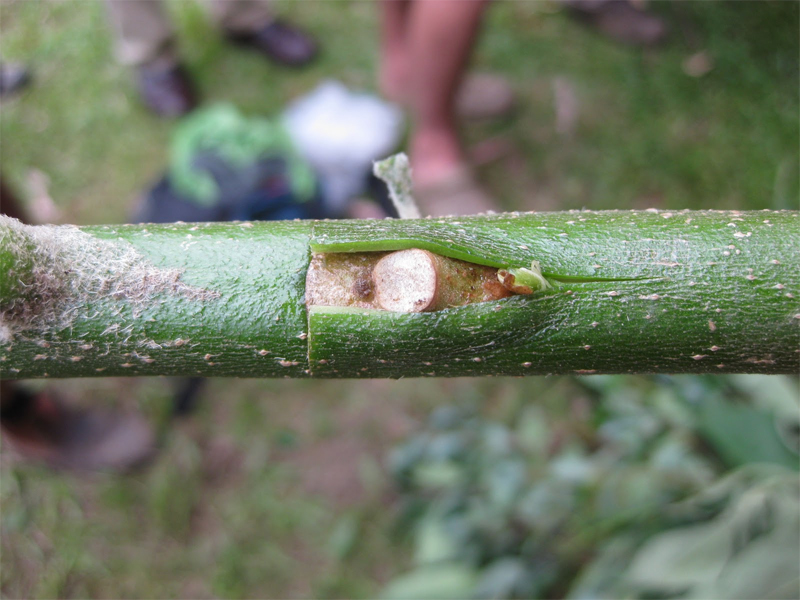
Budding
The third and final installment in the grafting series is all about budding. This is one of the easier grafting methods and is done about this time of year.
Last week, I talked about topworking an apple tree. That is, taking a scion with many buds and grafting it to the rootstock. Budding is similar in purpose but with one main difference: rather than taking an entire scion with multiple buds, you take one bud from a scion and graft it to the desired rootstock.
Unlike topworking, budding an apple tree is best done from late June to the beginning of August. During this time, it is said that the bark “slips”, meaning that it will easily lift and peel when cut. This makes the budding process much easier and there is less risk for damaging the tree.
Step 1: Preparing the Rootstock
After selecting your rootstock (remember what we talked about last week), you will begin the preparation. Clear the area around the base of the tree; you will be attaching the new bud about 10 centimeters (4 inches) from the soil surface. Remove side branches from this area as well. Remember to keep a sharp blade to make clean cuts.
Step 2: Preparing the Budwood
The budwood is equivalent to the scion from last week’s discussion. It is the piece you are taking from one tree with the goal of it growing onto another. Collect the scions in the same manner as I described last week. Choose healthy stems from the trees you want. Look inside the canopy for mature buds on this season’s growth. Wrap scions in moist paper towel and pace into labelled bags. Scions can be stored in the fridge for up to three days. The fresher the better, though so do all of your planning beforehand.
Step 3: T-Budding
Like topworking, there are many budding methods. T-budding is simple and efficient so I will discuss it solely here.
Rootstock preparation: get yourself a budding knife. It will save you time and it’s a lot safer. You want the new bud to be facing north or east to avoid scorching hot afternoon sun. With your knife, create a ‘T’ in the bark of the rootstock. Using the knife, carefully lift the bark where the vertical and horizontal cuts meet. You are creating flaps into which you will slide the new bud.
Bud preparation: remove your scion(s) from the bag and unwrap from paper towel. As you read these instructions, keep in mind the final shape you are looking for: a U with a flat top. Using your budding knife, cut into the scion about 1.5cm below the bud. Continue to cut upward to about 0.5cm above the bud. Once you reach the top, remove your knife and cut into the scion where your first cut ended (above the bud). This will create a straight cut across the top.
The goal is to remove only the bark and as little wood as possible. Again, the cambium must be exposed on each piece for the grafting to be successful. Keep both surfaces clean – do not touch them with your hands.
Insert the bud: once the bud is removed from the scion, carefully pull back the flaps of the T-cut you made and slide the bud down inside. The flat top should be on top. Allow the flaps to press against the bud. This will ensure close contact between the cambium of the rootstock and that of the bud.
The final step is to secure the bud to the rootstock. While the flaps are helping to keep the bud in place, it can’t hurt to give it a little extra support. Using budding rubber or grafting tape, wrap the tree while keeping the bud exposed. Be sure to wrap above and below the bud but do not cover the bud.
Watch the bud and make sure it has taken. It will not grow much but the bud will start to swell; if it has not taken, the bud will have shrivelled and died within a month or two.
Future Management
If your bud has taken, congrats! If not, no worries, simply try again next year.
There are a few options for management. If you are looking to create a new tree with multiple species, prune the tree as normal to ensure ample photosynthesis can take place. Bud only a few every year and label each branch (when they are large enough to tag). Eventually you can trim away all of the pre-existing limbs so you have only the desired, purposely grafted species.
Alternatively, if you are only looking to bud this tree once, in the spring, remove everything above where you grafted. The new bud will begin to grow and fill out. For symmetry, attach a few buds around the tree, taking special precautions to shade new buds facing west or south as the afternoon sun could cause them to burn.
This brings us to the end of our grafting series. Growing your own fruit trees can become quite the hobby if you so desire and it’s one of those hobbies that gives back year after year. Give it a try! See what you can come up with.


